Dell XPS 13 7390 and other machines: low or no microphone volume during Zoom calls

A pretty recent emerging issue I’ve encountered is problems with microphone volume during Zoom calls (specifically!) on some machines. One of the more popular models experiencing this problem regularly is Dell’s XPS 13 7390, which is an all-round terrific laptop. The common thread connecting all of these affected models is their use of the Realtek audio drivers (which very many laptops do these days).

The solution — or, at least, the workaround — for this one is actually quite simple. It turns out that the 4/22/2020 driver version of the Realtek Audio Driver is problematic when paired with Zoom specifically. Thus, rolling back this driver manually (by downloading a previous version from your manufacturer’s support site) should work.

Alternatively, though, you can actually just completely uninstall the driver altogether, forcing Windows to (at least temporarily) use the generic Microsoft High Definition Audio driver instead. Here’s how to (easily) accomplish that:

  • Click your search box and type appwiz.cpl, then press ENTER
  • In the resulting window, scroll down to Realtek Audio Driver
  • Click Uninstall and follow the prompts. Reboot.

After this, everything should be back to normal once again.

SOLUTION: Bluetooth mouse/keyboard delay in response after typing or lack of motion

Many machines experience a problem where a connected Bluetooth peripheral takes seconds to wake every time it’s left motionless for a short period or the user types on the keyboard. This delay can range between a second up to a few seconds, and it’s absolutely frustrating.

Fortunately, it’s also incredibly easy to solve:

  1. Right-click the Start Button and choose Device Manager.
  2. Expand Bluetooth.
  3. Right-click your Bluetooth adapter and choose Properties.
  4. Click the Power Management tab and uncheck the box that reads “Allow the computer to turn off this device to save power”

The power savings are minute at best anyway, and this should completely solve your problem. Enjoy, and you’re welcome! 😉

Bypass Microsoft Account Creation during Windows 10 Build 1909 OOBE Setup

This is a quick and easy one. In previous versions of Windows 10 setup, selecting an offline (so-called “limited”) account was relatively easy. However, with the latest build of Windows 10 Home, if the machine is connected to the internet during setup, the option disappears.

It’s true that you can simply disconnect from the network (or open cmd and delete the wlan profile), then click back and try again, to avoid this. But there’s a much easier way.

Instead, in the sign-in field, type a bunch of random numbers, then click Next. At this point, you can choose to create a local/limited account instead—even if you’re connected to the internet. It’s really that easy!

SOLUTION: “There is a problem with the selected printer” when printing email in Outlook

Today, I encountered an issue that was new to me. A client’s PC refused to print any email within Outlook (in her case, Office 2013 version, but the same problem persisted in Outlook 365 prior to my correcting it). The error message she received was:

There is a problem with the selected printer. You might need to reinstall this printer. Try again, or use a different printer.

The problem persists regardless of which printer is selected—even if it’s a default built-in virtual printer such as Microsoft Print to PDF or the XLS printer. However, it won’t necessarily affect all email messages.

So, what’s the deal? As it turns out, this problem is caused by a corrupted font. Knowing this is half the battle—but unfortunately, it’s only the start of the process you’ll need to follow in order to fix it.

As the folks over at Kinetic Computer Services explain, copying and pasting the entire contents of an affected message into Word (Close Word if open, CTRL+A + CTRL+C to copy, then reopen Word and paste using CTRL+V) will generate a related (but different) error if you wish to confirm that this is actually the case. Word will complain that “There is insufficient memory or disk space. Word cannot display the requested font.”

You might think that simply reinstalling all system fonts would correct this problem, but as I discovered, it sadly does not. The System File Checker also doesn’t fix anything. So, instead, you’re left to identify the affected font on your own and then take action.

What I did was to highlight small sections of an affected email message and copy and paste them individually into a new Word document until the error message appeared. This was much easier than attempting to step through an affected document and identify manually which font might be to blame based on differences in appearance. In my client’s case, it was the Papyrus font that was bad.

!


Keep in mind that after the error appears once, you’ll need to close Word to provoke it to appear again. So after the copy/paste of the entire message the first time, close Word, then reopen it before beginning your sectional diagnosis of the email content.

Once you identify the affected font, open a Windows Explorer window and navigate to C:\Windows\Fonts. Search for the font that’s affected, highlight it, and copy it someplace else for backup purposes just in case. Then, simply delete the font from the C:\Windows\Fonts folder. If it’s a critical system font, Windows should automatically replace the file for you. If it doesn’t, try right-clicking the copied file (located outside of the Windows Fonts folder) and choosing Install for all users. It should complain about the font being corrupted, and then install a good version for you automatically.

If all else fails and Windows can’t work this out on its own, find yourself another Windows machine and manually copy the font from there, then install it on the affected machine. Once this is all done, close and reopen Outlook—and the problem is solved!

SOLUTION: Word/Excel hangs when opening files/scrolling is greyed out

Recently, a number of machines I’ve serviced have experienced a problem where particular Office files hang when scrolling through them. At first, this seemed likely to be an issue with Hardware Accelerated graphics rendering, but that wasn’t the case.

The actual issue lies with what’s called Protected View. It’s designed to bolster security by limiting the permissions of files opened from risky locations, but at least currently, it’s leading to some broken functionality on a lot of machines.

The best solution that I’ve found (as a workaround) is to simply disable Protected View entirely until Microsoft sorts this out and releases a patch. Here’s how to do that:

  1. Open the affected Office application (you have to do this separately with all affected applications)!
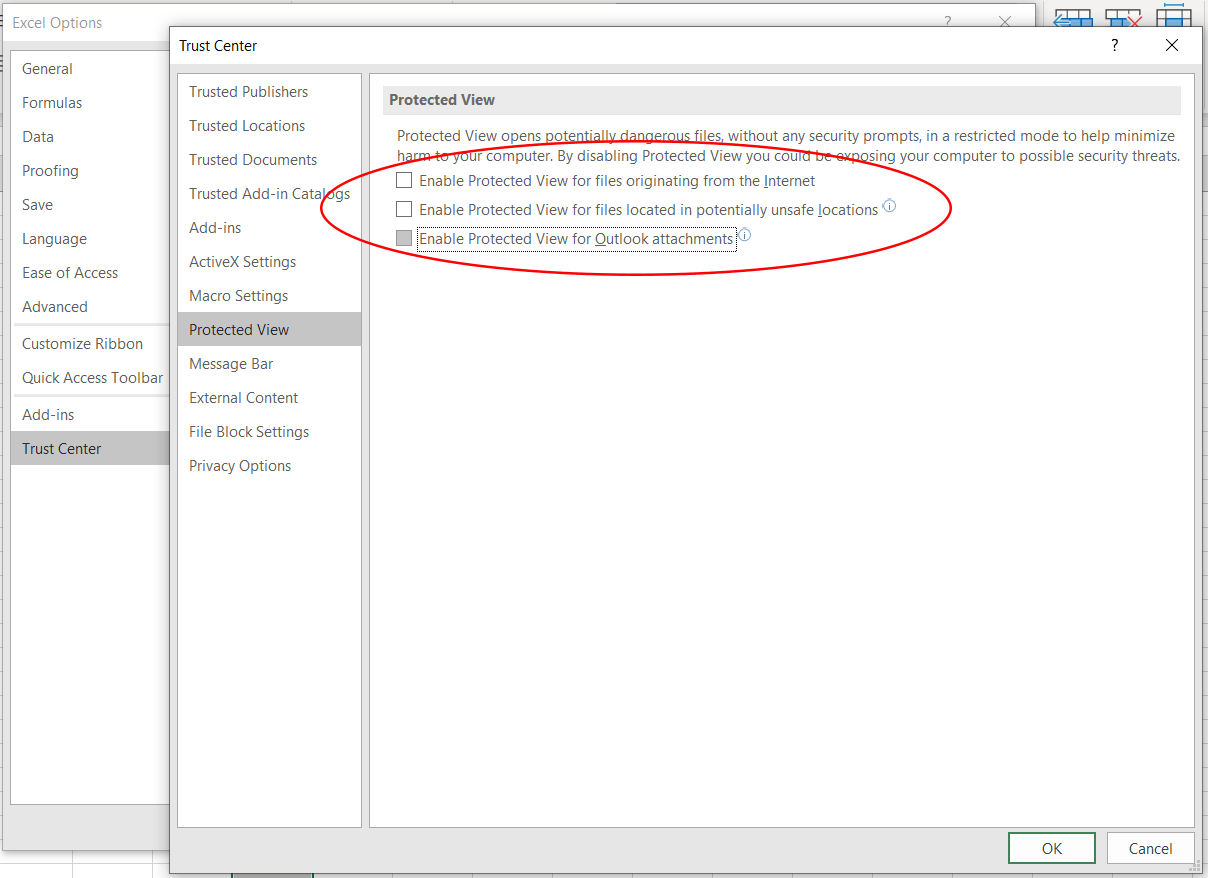
  2. Navigate to: File > Options > Trust Center > Trust Center Settings > Protected View
  3. Uncheck all of the items within this dialog, as seen below.

Problem solved!

SOLUTION: Black screen on boot with mouse cursor, Windows 10 Fall Creators Update [Build 1709]

Recently, I’ve seen more and more machines (still a small amount, but an increasing number seemingly) with a problem upon boot following some recent updates to the Windows 10 Build 1709 subsystem.  Specifically, these machines hang on boot at a black screen following the Welcome/login screen with only the mouse cursor present for anywhere from a few to several minutes.  Task Manager can be invoked and CTRL+ALT+DEL still works, but the machine will not operate normally with the usual Windows shell interface (explorer.exe GUI etc.) until the process sees itself through to fruition.  This happens at each and every boot.

Microsoft has indeed acknowledged this issue, blaming it on some rogue registry keys supposedly put in place by some OEMs which are incompatible with the latest builds of Windows 10.  However, I’ve come to doubt that explanation, as the fix they provide in the relevant KB article has not yet once worked on any of my clients’ machines, and another, more foolproof fix has instead corrected the problem.

This is the service which causes all of these headaches.

This is the service which causes all of these headaches.

A while back, people discovered that the singular service responsible for this behavior is the App Readiness service, which prepares user data the first time a user logs on following the installation or update of a Windows Store app.  Disabling this service does correct the problem.  If you experience this exact behavior, I have what is likely a permanent fix for you however, and best of all, it’s easy.


First, determine if this particular problem applies to your machine. Lots of things can lead to hangs during the boot process, so before you proceed further, it’s a good idea to ensure that the App Readiness hang is actually what is afflicting you:

  1. Boot the machine normally.
  2. During the hang at the black screen, press CTRL+SHIFT+ESC to bring up Task Manager.
  3. Choose File > Run New Task.
  4. Type msconfig and press ENTER.
  5. Click the Services tab, uncheck App Readiness, and click OK.
  6. Either wait out the rest of the boot procedure and then reboot your PC, or force a reboot by returning to Task Manger and running this task: shutdown -r -t 0
  7. Upon reboot, if the problem disappears, this is indeed your issue.
  8. If the problem is solved, next reverse the procedure by rerunning msconfig and rechecking the box next to App Readiness.  Reboot again and allow the slow boot procedure to complete.

The reason you need to reenable App Readiness is that without it, the next steps will fail.

You can also disable the service via the standard services.msc snap-in interface if you prefer that.

You can also disable the service via the standard services.msc snap-in interface if you prefer that.

Once the diagnosis is complete, the next step is easy.

  1. Obtain Windows 10 Fall Creators Update (Build 1709) or later installation media directly from Microsoft’s software download website (update May 2018: the latest build is now 1803, the April Update). Try using the “Download Tool Now” button method and creating an installation DVD first, as this procedure is more likely to succeed.
  2. Once you have created the DVD, run the setup process from the DVD and choose to upgrade Windows while retaining all apps and user data.  This process is called an in-place upgrade as has been available for many years now within Windows (barring a short hiatus).
    1. If a DVD drive is not available, you can simply mount the resulting ISO file and install it from the virtually mounted ISO.
    2. If both of these methods fail, you can try using the Windows 10 Update Assistant tool from that same webpage instead.
  3. See the installation through to completion.
  4. Once finished, reboot and see if the problem is fixed.  It should be!

I hope this helps restore sanity to someone’s computing life.

SOLUTION: Outlook 2016 will not start (stuck on “Loading Profile”)

This morning, I received a call from a client who was unable to open Outlook 2016 suddenly following an upgrade to the Windows 10 Creators Update.  This problem may or may not have been directly related to that update, but the timing was at the very least coordinated with it.

Each time the client clicked the shortcut to open Outlook, the splash screen opened and Outlook would hang on the “Loading Profile” screen.  These sorts of symptoms are actually not all that uncommon, and a range of different solutions exist to rectify them.

The solution this time, however, was not at all obvious.  After trying all of the usual fixes:

  • Disabling Hardware Acceleration via the registry
  • Starting Outlook in Safe Mode (outlook.exe /safe)
  • Checking/disabling compatibility troubleshooter flags on the Outlook shortcut
  • Resetting the nav pane (outlook.exe /resetnavpane)
  • Creating a new Outlook profile
  • Repairing Outlook via an Office 2016 Online Repair
  • Completely reinstalling Office 2016
  • sfc /scannow
  • DISM /Online /Cleanup-Image /RestoreHealth
  • netsh winsock reset
  • netsh int ip reset
  • ipconfig /flushdns
  • A complete Windows 10 “network reset”

Nothing corrected the problem.  Only one bizarre workaround provoked it to open with the Exchange account attached, and that was to disable all network connectivity (in other words, by invoking, for instance, Airplane Mode).  While disconnected, Outlook opened right up.

Some troubleshooting using Process Explorer revealed that Outlook TCP connections were opening but apparently failing during the launch.  This, along with a run of the Microsoft Support and Recovery Assistant for Office 365, eventually led to the solution:

Disabling IPV6 in the network adapter!

Here’s how:

  1. Right-click the Start Menu and choose Network Connections.
    1. (If on the latest Windows 10 build, you’ll need to perform this step next:) Scroll down to the bottom and click Change adapter options
  2. Double-click your primary network adapter.
  3. Click Properties.
  4. UNcheck Internet Protocol Version 6 (TCP/IPv6)
  5. Click OK.

Voila!  Outlook now opens normally.

After this one, I had a beer.

SOLUTION: “The requested system device cannot be found” on UEFI systems

With GPT disks and UEFI all the rage now, it’s not uncommon to encounter a scenario where boot parameters need to be repaired in order to reach the operating system.  Generally speaking, it’s often easy enough to accomplish this by executing the command bcdboot X:\windows (where X is the system drive letter) from a recovery environment.

However, other times, even in spite of this command properly completing, the system still will not boot.  In many cases the failure is evident when attempting to perform bcdedit /enum and receiving a message such as this one:

The boot configuration data store can not be opened.
The requested system device cannot be found.

Performing bootrec /fixboot also provokes the following error:

Element not found

This is bad news on a GPT disk using UEFI rather than BIOS.  Essentially, the system is looking for the EFI partition, which in this case is either missing or corrupt.

If it’s corrupt but still exists, you can simply enter diskpart, select the system partition (usually around 500 MB in size and with an ID of “EFI”) and assign it a letter, exit diskpart, and then perform a chkdsk command on the new partition assignment.  This sometimes will correct it.  Other times, forcibly removing the EFI and boot folders from the EFI partition and then executing the bcdboot command with a specific system partition parameter (e.g.: bcdboot X:\windows /s E:, where X: is the Windows partition and E: is the EFI paritition) works.

But let’s say the partition is missing altogether.  This is most often the case following a drive image using imaging tools to a new SSD for example.  Sometimes the tools (especially if executed externally on another system rather than live within the target OS) will remove the EFI partition and only image the Windows partition.

If this happens, most people will tell you that you will need to reinstall Windows from scratch.  However, all is not yet lost!  It’s fixable — but in order to accomplish it, you must recreate the EFI partition manually and then reload the boot parameters from there.

Here’s how it’s done at a command prompt from a recovery environment.  I’ve bolded the commands I typed to make it easier to read — hold on tight:

X:\windows\system32>diskpart

Microsoft DiskPart version 10.0.10240

Copyright (C) 1999-2013 Microsoft Corporation.
On computer: MININT-3A416N9

DISKPART> list disk

Disk ### Status Size Free Dyn Gpt
——– ————- ——- ——- — —
Disk 0 Online 489 GB 0 B *

DISKPART> sel disk 0

Disk 0 is now the selected disk.

DISKPART> list part

Partition ### Type Size Offset
————- —————- ——- ——-
Partition 1 Primary 489 GB 1024 KB

DISKPART> sel part 1

Partition 1 is now the selected partition.

DISKPART> shrink desired=1024

DiskPart successfully shrunk the volume by: 1024 MB

DISKPART> create partition efi size=260

DiskPart succeeded in creating the specified partition.

DISKPART> format quick fs=fat32

100 percent completed

DiskPart successfully formatted the volume.

DISKPART> exit

Leaving DiskPart…

X:\windows\system32>bcdboot c:\windows
Boot files successfully created.


Following these steps, the machine should now be bootable.  If it’s not, it’s probably time to call a professional!

Good luck!

 

SOLUTION: “Restart your computer to install important updates” won’t go away in Windows 7

In recent weeks, I’ve encountered multiple machines unable to install Windows Updates thanks to a perpetual message claiming:

No matter what the user does, these machines simply won’t install any updates.  If they’re rebooted as requested, nothing happens, and the message simply reappears upon reentering Windows, no matter how quickly the user attempts to invoke the process.  Resetting the SoftwareDistribution repository, by the way, does not solve this problem.  Neither does restoring the conventional Windows Update settings using a variety of troubleshooters, such as the Microsoft troubleshooter.

What does work, however, is removing a single registry key which is responsible for the problem:

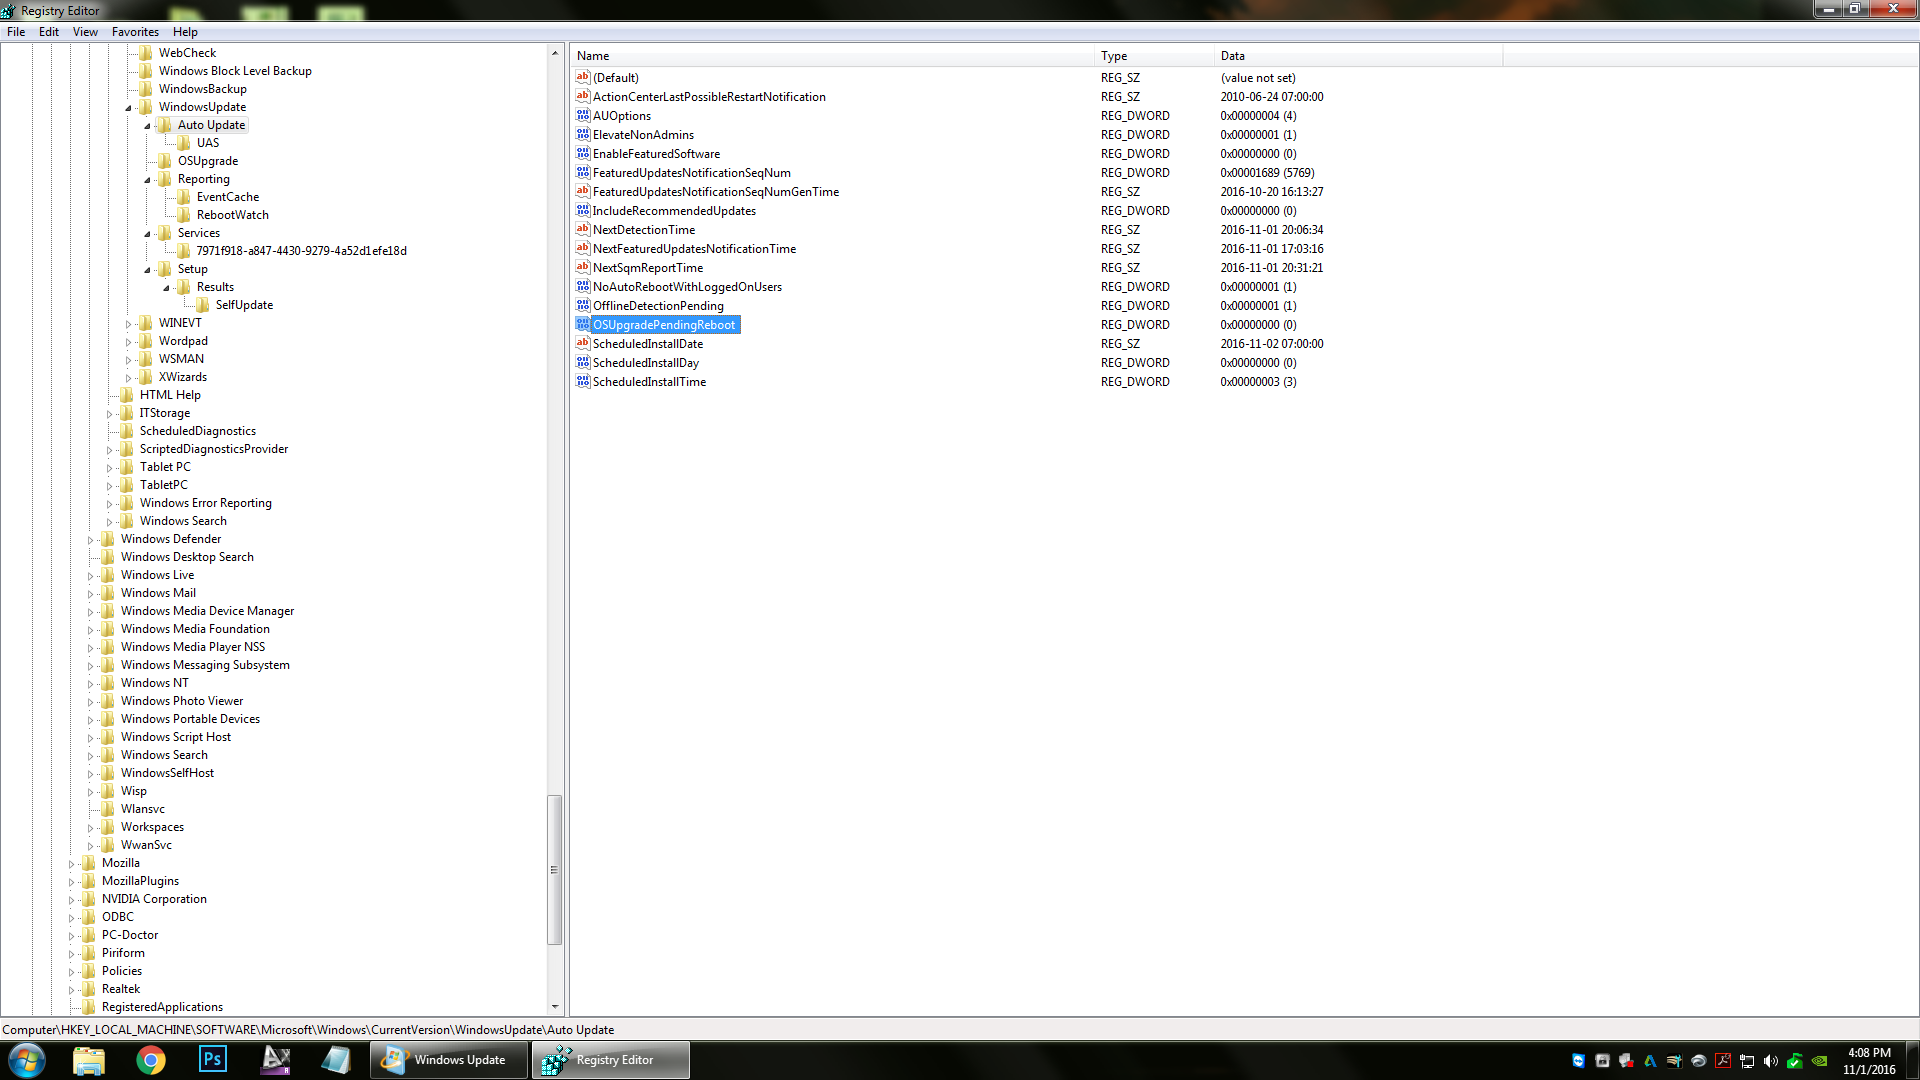
osupgrade-key(apologies for high-res screenshots; I’m too lazy to correct this)

The particular key in question is:

  • HKLM\SOFTWARE\Microsoft\Windows\CurrentVersion\WindowsUpdate\Auto Update\OSUpgradePendingReboot

All that’s necessary is to delete this key, and the problem evaporates, like it never even happened!  The key is related to the Windows 10 in-place upgrade process which (used to) take place through Windows Update.  The situation seems to suggest that these machines were nearing the final stages of the upgrade when something happened and they failed to install it.  Now, the upgrade windows has officially passed.

As always, of course, it’s wise to create a System Restore point before modifying your registry, etc., yada yada.

Hope this helps!

SOLUTION: IAStorDataSvc consumes 20-40% CPU following Windows 10 build upgrade

Intel’s Rapid Storage Technology drivers haven’t been getting a lot of love from me recently, and unfortunately, that isn’t about to change today.  A recent Windows 10 upgrade (the Anniversary Update, build 1607) also includes a new Intel RST driver, and on some systems, it’s a source of significant headaches.  These systems are stricken by suddenly noisier than usual operation and higher temperatures, both of which stem from higher-than-normal CPU consumption from the Intel RST system service.

How do you know if your system is affected?  In Task Manager, you should see IAStorDataSvc consuming CPU cycles in excess of 20%, and sometimes as much as 40%.  You can kill the process, but the permanent fix is to uninstall Intel Rapid Storage Technology entirely.  The program is unnecessary for the drivers to continue functioning normally, so it won’t hurt to simply leave it out in most cases.  Before you do so, however, for safety’s sake, you’ll want to create a System Restore point.

You can also upgrade the package to its latest available version in hopes that this will correct it.  If you wish to do so, Intel lists it in the Download section on their site, or you can obtain them directly from your PC manufacturer.