SOLUTION: Microsoft Outlook 2013 hangs at “Loading Profile…” after Office Update

Now here’s an interesting conundrum.  A recent update to Microsoft Office 2013 that’s being pushed out automatically to clients results in some of them being unable to open Outlook 2013.  Instead of running normally, the program will hang at the “Loading Profile” stage of launch, as though the profile is corrupt (if you haven’t already checked this, it could actually be the case instead of course).  A workaround is to open Outlook using the well-known /safe command line switch; but this is merely a workaround (which in turn disables all add-ons), not a permanent solution.

For a much more reasonable resolution, try this instead:

  1. Run regedit (Start > Run > type regedit and press ENTER)
    1. On Windows 8, Win + R; type regedit and press ENTER
  2. Navigate to HKEY_CURRENT_USER\Software\Microsoft\Office\15.0\Common
  3. Right-click, select New > Key and name it Graphics
  4. Select the Graphics key you just created, right-click in the right panel and choose New > DWORD (32-bit) Value and name it DisableHardwareAcceleration.
  5. Double-click the new value and assign it a value of 1.
  6. Close regedit and try opening Outlook again.

This should fix the problem.  I first stumbled upon the solution when I realized that opening my TeamViewer Remote Support program while Outlook was loading kicked it into launching, which suggested either a network- or graphics-related cause (as TV affects both of those when launching).  The original solution listed here came from the Microsoft Office 2013 Issues Blog, though the symptoms listed are different from these.

Hope this helps! 🙂

SOLUTION: Dell Laptops Hang on Reboot/Shutdown after Windows 8.1 update

I’ve recently encountered a pretty new issue involving some Dell laptops where the system will simply hang at a black screen, completely blank, when a shutdown or restart is initiated.  This behavior occurs following the installation of the free Windows 8.1 update.  There is no evidence present in the Event Log or anywhere else to indicate what might be to blame, and nothing on the internet that I could find references the issue.

In my case, I encountered the problem while setting up around 10 Dell Latitude E7240 (Latitude 12 7000 Series) notebook computers for my clients.  The solution, as it turns out, is pretty simple.

As usual, it’s a driver which is to blame for the problem.  I first stumbled across the solution while troubleshooting when I decided to disable the wireless adapters (Wi-Fi and Bluetooth) using the hardware wireless switch on the side of the computer before shutting down.  You’ll notice that while Airplane Mode is on, the system reboots/shuts down just fine.

It’s because of the Dell Wireless 1601 WiFi/BT driver that’s preinstalled; for whatever reason, the Bluetooth portion of it is incompatible with Windows 8.1.  Explicitly disabling Bluetooth also fixes the problem, confirming that this is the source of the issue.

To correct it once and for all, here’s what you need to do:

  1. Download this driver from Dell.
  2. Choose to Extract Without Installing and specify a location of your choice.
  3. Wait a few seconds for the confirmation dialog to appear, then click View Folder.
  4. Double-click the Install_CD subfolder to open it.
  5. Run setup.exe and follow the instructions.
  6. Reboot the computer.

The problem is solved!

I presume this most likely affects all Dell computers running the A01 version of the driver.  I hope this solution has helped you!

SOLUTION: Windows Vista In-Place Upgrade fails when PowerShell is installed

This one’s quick and easy.  On multiple occasions, I’ve encountered problems with Windows Vista performing an in-place upgrade (in situations where conventional repairs are not sufficient and such measures are necessary) if the client’s machine has Windows PowerShell installed.  PowerShell is listed as incompatible with the upgrade procedure by the Setup process.  Usually, it’s as easy as removing it via Control Panel > Programs and Features > Turn Windows features on or off, but on more than one occasion, when a workstation is really screwed up, this process fails.

In those cases there are two other options you can try.  The first is to head to Programs and Features, choose View installed updates, and remove Windows Management Framework Core, which is the update associated with PowerShell.  If this STILL doesn’t fix it, however, there’s one surefire way to do so:

  • Simply rename the directory %SYSTEMROOT%\System32\WindowsPowerShell (where %SYSTEMROOT% is the system environment variable for the Windows directory).

This easy workaround will allow the upgrade to proceed, which will usually fix most serious problems with a Vista installation and pave the way for updates and other corrections before wrapping up the work.  It’s just another way I’ve been able to avoid a reinstallation of Windows under circumstances which would normally seem to suggest it as the only option.

SOLUTION: Recover/import Windows Live Mail Contacts to new computer

So today I was tasked with recovering a client’s contacts stored in a Windows Live Mail edb database for the first time.  At first, it seemed like a daunting task–primarily because I could not get a (previously) popular solution involving the now-deprecated EseDbViewer to work.  That’s because, as I later discovered, the process must be performed on the original PC in order for it to work; if you try it using the recovered files on another machine, it simply fails.

Update: A reader, Chris Siddons, has posted an alternate method to accomplish this for those with a great number of contacts.  Feedback indicates that it works quite well.  Thanks, Chris!  Here is his method:

1) On my old PC, I Located the folder “C:\Users\{Username}\AppData\Local\Microsoft\Windows Live\Contacts\Default” (obviously, replacing your user name as appropriate)

2) I copied the entire contents of this folder to a temporary location (memory stick, or another way of transferring the data to the new PC.

(NB This folder contains three folders, 15.4 15.5 and W4CR1, which appear to be empty but contain various hidden folders and files, including several versions of contacts.edb, so you may appear to be copying empty folders, but don’t worry about this, just follow these instructions as they worked for me!)

3) I located the folder “C:\Users\{Username}\AppData\Local\Microsoft\Windows ive\Contacts\Default” on the new PC and deleted the contents, then replaced them with the contents of the Default folder from the old PC.

Following is the remainder of the original blog entry:

Fortunately, as is usually the case, there is another way around this problem, and it’s actually quite easy.  The goal is to get the contacts from the edb into a readable .csv (Comma Separated Values) file for import into Windows Live Mail.  And a company known as Nirsoft (who makes a number of helpful tools, often of forensic nature) has a program that works perfectly.

It’s called LiveContactsView, and it’s designed for viewing Windows Live Messenger contacts.  However, Windows Live Mail uses the same format for storing its contacts, so it works here, too.

Here’s the full process:

  1. Download LiveContactsView.
  2. Recover the original Windows Live Mail contacts database files from the failed PC/original drive:
    • They’re located in %LOCALAPPDATA%\Microsoft\Windows Live Contacts\{GUID}\DBStore, where %LOCALAPPDATA% is an environment variable equivalent to \Users\{USERNAME}\AppData\Local\ on the drive, and {GUID} is a random string assigned to the original user’s profile.
  3. Using LiveContactsView, open the contacts.edb file from the DBStore folder.
  4. Select all fields within the list view.
  5. Export the items to a .csv file.
  6. Import the .csv file into the mail client of your choice.

That’s it!  It’s actually remarkably simple, and it is the best (and only) method I’ve found to accomplish this to date.

SOLUTION: “This is Microsoft Support” telephone scam – Computer ransom lockout

A trend of the past couple of years has been for scammers to contact computer owners directly via telephone in the United States in an effort to convince them that there is a problem with their PC and they’ll need to pay to have it fixed.  In general, these people cannot fix anything, and instead they merely charge exorbitant fees for absolutely nothing. In other words, they scam you.

The call generally goes something like this:

  1. A foreigner with a thick Indian accent identifies himself as a member of Microsoft Support or similar.
  2. He informs you that you have a number of critical problems with your PC and that you will need to have it fixed.
  3. To convince you, he offers to connect remotely and pulls up your Event Log (eventvwr.msc).  He then filters for Warnings, Errors, and Critical events and uses that as evidence that your PC will soon fail to work correctly if you do not pay him to correct it.

The astute among you have probably already sensed that something here is seriously wrong, and it’s not your PC. It’s the fact that someone is calling you to tell you there is a problem with your computer. No one will ever do that. The only way they could possibly know there is a problem is by hacking or guessing.

In this case, it’s mere guesswork, and it’s not even correct most of the time. The Event Log is supposed to log warnings and errors, and even on the healthiest of PCs there are plenty of Error Events that can be safely ignored, as they often don’t amount to anything. The important thing to remember is to never trust someone who calls you about a problem with your PC, and never, EVER let them connect remotely to your PC.

If you do make the mistake of letting them connect, but then you happen to get cold feet and refuse to pay the $180+ they request via credit card, the next thing that happens isn’t pretty. This scammer proceeded to actually follow through on his promise of the PC “not working” if they don’t agree to have him fix it, and so in a few quick steps, behind the user’s back, he enacted what is known as SysKey encryption on the SAM registry hive.

SysKey encryption is a little-known feature of Windows which allows administrators to lock out access to the Security Accounts Manager (SAM) registry hive so that login specifics cannot be stolen and the PC cannot be accessed without knowing the proper credentials. The problem is, unlike other scams, there is no way around the problem; you can’t simply remove the password, as the actual SAM hive has been encrypted entirely by the process. If your Windows installation has had SysKey activated, you’ll see the following message:

Startup Password

This computer is configured to require a password in order to start up. Please enter the Startup Password below.

The window which appears looks like this:
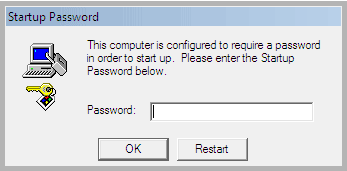
This computer is configured to require a password in order to start up. Please enter the Startup Password below.

The ONLY solution is to find a clean copy of the registry hives from before this occurred. This scammer knew this, however, and as such, he took an extra step to block any repair or recovery attempts: he deleted all System Restore points on the machine, which normally house backup copies of the registry hives.

Unfortunately for him, I’m a much better technician. When the customer suspected foul play and decided to call me instead of proceeding, I immediately instructed them to power off the PC. Here’s how I fixed the problem without having to reinstall Windows.

FIRST, ensure you don’t have any Restore Points to work with:

  1. Check to ensure that the folder %SYSTEMROOT%\system32\config\RegBack exists.  This is the folder which contains the last known good backup of the hives following a boot.  If it exists, continue.  If not, stop and consider contacting a technician instead.
  2. Reboot the PC and repeatedly press F8 to reach the Advanced Startup Options menu.
  3. Choose Repair your Computer from the menu.
  4. Cancel the automatic repair attempt and instead instruct the system to perform a System Restore to a date prior to the incident occurring.

If no Restore Points exist, your scammer intentionally removed them to prevent this from occurring.  If this happens to you, follow these additional steps to resolve the problem:

  1. POWER OFF your PC immediately.
  2. Boot to external media of some sort (NOT your Windows installation) and navigate to the %SYSTEMROOT%\system32\config folder.
  3. Backup the registry hives in this folder to a temporary location. The files are:
    1. SOFTWARE
    2. SYSTEM
    3. SAM
    4. SECURITY
    5. DEFAULT
  4. Navigate to %SYSTEMROOT%\system32\config\RegBack as mentioned earlier.
  5. Copy all registry hives from this folder (the same files as listed above) into the %SYSTEMROOT%\system32\config folder.
  6. Reboot the PC.

This solution only works if you have not already tried to reboot the PC subsequently.  If you have, it may still work, but that is entirely dependent upon whether or not Windows created a new RegBack copy following a successful boot.

In the case of my customer, it worked, and they were back in Windows, just like it never happened.  Nice try, scammer.  You’ll have to try harder to beat me though. 🙂

Addendum A (update 6/26/2015):

Thanks to FUScammers for pointing out this more involved, alternate method of actually removing the SAM encryption.

  1. Download this file and burn the .iso to a CD.
  2. Boot to the CD on the affected system.
  3. Follow the instructions to select the proper system drive and partition (NTFS is the partition type you are looking for).
  4. Type the path to the registry files (it’s most likely Windows/system32/config).
  5. Choose option 1 for Password reset (sam system security).
  6. Choose option 2 for Syskey status & change.
  7. Confirm that you wish to disable Syskey, then quit and confirm writing the new changes to the hive.
  8. Reboot the PC and check.

For more detailed instructions, check out this link (scroll down to “How to disable Syskey startup password”):

http://computernetworkingnotes.com/xp-tips-and-trick/remove-administrator-password.html

In Windows 8, the GPT partition type makes the use of this utility impossible.  However, you can still manually copy the hives to a supported filesystem (NTFS or FAT32), mount that filesystem instead, and follow the steps from there, then copy the hives back over the originals.  I can confirm that this method does work and that even in Windows 8.1 recovery is possible using it.

Solution: Outlook Error: “Outlook Data File Could Not Be Accessed”

This is a pretty annoying little problem that I’ve seen at least a couple of times over the past several months.

It occurs when you attempt to sync within Outlook, normally following a data transfer or other procedure that involves bringing an existing .PST file into play without jumping through the hoops of importing the data into a new .PST shell.

The solution is actually easy, though it’s not necessarily easy to discover.  All you have to do to solve the problem is select the folder to deliver mail to (Inbox) for each email account.  Under the Account Settings dialog box within Outlook, there is a Change Folder button near the bottom.  This is where the setting is changed.

But what if you can’t even open Outlook?  You can still access the mail settings without running the program.  The easiest way to do this is to click Start > Start Search > type mail and then open the Mail shortcut that appears under the Control Panel heading in the search results.  This opens the standard Outlook mail dialog box as if you were running Outlook.

Solution: Google Chrome error: “An error has occurred – Download was not a CRX”

I’ve seen this problem increasingly often with the latest version (24) of Google Chrome.  It happens when trying to install an extension from the Chrome Web Store — and nothing seems to correct it.

An error has occurred
Download was not a CRX

So, what’s the solution?  Visit the Chrome Web Store from within Incognito Mode, then install the extension from there.  Problem solved!  (Or, at least sidestepped anyway.)

Solution: Windows could not connect to the Group Policy Client service

Under specific circumstances, I’ve encountered this message following a reboot on systems I am repairing/setting up:

Failed to connect to a Windows service

Windows could not connect to the Group Policy Client service. This problem prevents standard users from logging on to the system. As an administrative user, you can review the System Event Log for details about why the service didn’t respond.

The System Event Log also logs an event regarding the service timing out.  When attempting to stop/restart/configure the service, none of the options are available; they’re merely greyed out, though the service is present.

The solution is pretty simple:

  1. Change the permissions on the relevant keys configuring the Group Policy Client service to allow Full Control to Administrators.
    1. Open regedit (Start > type regedit in the search box) and navigate to:
      HKEY_LOCAL_MACHINE\SYSTEM\CurrentControlSet\services\gpsvc
    2. Right-click the registry key and choose Permissions.
    3. Click Advanced, then click Owner.
    4. Choose Administrators and check the Replace owner on subcontainers and objects box.
    5. Exit the permissions dialog and then open it again.
    6. Click Advanced, then choose Administrators and click Edit…
    7. Check Allow underneath Full Control, then click OK.
    8. Check Replace all child object permissions with inheritable permissions from this object.  Click OK and confirm; exit.
  2. Download the default gpsvc configuration information corresponding to your version of Windows:
  3. Back at the Registry Editor window, click File > Import… and choose the .reg file you downloaded above.
  4. Merge the changes with the registry.  Reboot.

Problem solved!

Solution: Recover an Outlook 2007 Business Contact Manager Database from a failed PC

Computer dead?  Don’t have a good backup of your Business Contact Manager data?

This is a serious problem.  It’s not an easy thing to find a solution to, either; those that exist only seem to work for some people, and only under particular circumstances, too.  So in this post, I’ve set out to provide a solution that should work for everyone–hopefully.

Just one preliminary note: this only pertains to the 2007 version of Outlook. While it may work in other versions, I haven’t tested it there.

Okay.  So you’ve got a dead computer (maybe yours, maybe your client’s), and you have the files recovered from the drive–perhaps from a backup.  But unfortunately, as simple as it ought to be, recovering a Business Contact Manager database is far from it.  You can’t simply retrieve the files and then import them somehow.  In fact, from my recent experience, you can’t even make it work unless you follow a very specific order of operations.

Here’s how it’s done:

  1. You first need the *.mdf and *.ldf files from within the Business Contact Manager Local Application Data/%LocalAppData% directory.  Be sure to copy only those files which correspond to your current database (probably those with the most recent Modified date).  You can retrieve those from the failed drive (or backup) by navigating here:
    • On XP, they’re in %USERPROFILE%\Local Settings\Application Data\Microsoft\Business Contact Manager
    • On Vista/7, they’re in %LOCALAPPDATA%\Microsoft\Business Contact Manager
  2. Copy these files to the new PC and place them in a temporary location on the new PC (such as the user’s Windows Desktop).
  3. Install Office 2007 (if it isn’t already installed), along with the Business Contact Manager.
    • If Office is already installed and you’ve already configured Business Contact Manager, you have no choice but to completely remove everything related to Business Contact Manager.  That means everything: Business Contact Manager 2007, and all listed software related to SQL Server 2005. 
  4. Install Microsoft SQL Server 2005 Service Pack 3 (you’ll need the very latest version just in case the files are from a later version than the freshly-installed one, which is likely).
  5. Open Outlook 2007.  Start the Business Contact Manager wizard and instruct it to create a new database with the same name as the old database.  If you’re unsure what the old database was named, it’s easy to tell: simply take whatever text comes before the .mdf and .ldf (it should be identical), and that’s your database name.  It’s very important that the names match!
  6. Immediately close Outlook after the database creation is complete.
  7. Stop the MSSQL$MSSMLBIZ service.
    • You can either use the services.msc interface to do so or open a Command Prompt and type sc stop “MSSQL$MSSMLBIZ” at the prompt (then press ENTER).
  8. Copy the .mdf and .ldf files from the old PC (wherever you saved them) to the Business Contact Manager working directory on the new PC, overwriting the new files with the old ones.
    • It should be obvious where the working directory is located.  If you’re unsure, re-read the sub-points on Step 1.
  9. Set permissions on the .mdf and .ldf files to allow Full Control to Everyone.  Here’s a helpful page on the subject in case you aren’t familiar with this process.  Be sure you set the permissions correctly!
  10. Restart the MSSQL$MSSMLBIZ service.
    • Again, you can use services.msc or type sc start “MSSQL$MSSMLBIZ” at a Command Prompt.
  11. Finally, start Outlook 2007 and verify that all data has been successfully recovered.

Congratulations, you’ve done the impossible!

Solution: Repair damaged/missing services following malware infection

Many times, following a nasty infection (such as that of various rogues or rootkits), you might notice that some of the critical Windows services are missing (such as the Security Center or Windows Firewall), or that Windows seems to be devoid of some typically critical functionality (such as Windows Update).  Apart from the obvious corrective measures that often must be taken post-disinfection (such as reinstalling any security software which might have been damaged), repairing system components can be much tougher.

Today, I’ll focus specifically on how to detect/repair some of the most commonly damaged services following an infection.  The four most commonly-damaged services are:

  • BITS (The Background Intelligent Transfer Service)
  • wscsvc (The Windows Security Center Service)
  • (not present on XP) BFE (The Base Filtering Engine Service)
  • (not present on XP) MpsSvc (The Windows Firewall Service)

It’s easy to understand why these services specifically are targeted by infections: all of them are potential threats to the malware, as they deal directly with Windows’ ability to protect and update itself.

The easiest way to detect missing or damaged services is to run these commands at the Command Prompt:

sc query bits

sc query wscsvc

sc query bfe

sc query mpssvc

As mentioned above, the bottom two services don’t exist on XP.  You can also script this using batch like so:

echo Checking for damaged Windows services...

sc query bits|find "The specified service does not exist as an installed service.">nul&&( echo BITS Service [BITS] does not exist )

sc query wscsvc|find "The specified service does not exist as an installed service.">nul&&( echo Security Center Service [WscSvc] does not exist )

sc query bfe|find "The specified service does not exist as an installed service.">nul&&( echo Base Filtering Engine Service [bfe] does not exist )

sc query mpssvc|find "The specified service does not exist as an installed service.">nul&&( echo Windows Firewall Service [MpsSvc] does not exist )

If any required services return an erroneous response (i.e., “The specified service does not exist as an installed service.”) then it’s pretty clear that damage has been done by the infection which requires repair.

At this point, you have to first check to ensure that the relevant system files for each service are still intact.  The easiest way to do this is to perform a sfc /scannow operation at the command line (run as Administrator) and ensure that any damaged files were successfully repaired.

Next, it’s generally as easy as reimporting the default registry keys corresponding with each missing service.  This isn’t difficult once you find a reliable location to acquire those keys.  The best place available is currently BleepingComputer.com’s Index of Windows Services.  Simply choose the folder which matches your operating system, select the name of the damaged/missing service, download the file, and import it into your registry.

After this is finished, you’ll still need to set each service to its default Startup type.  The easiest way to do this is to simply type each of these commands at the Command Prompt (again, running as Administrator):

sc config BITS start= delayed-auto

sc config wscsvc start= delayed-auto

sc config BFE start= auto

sc config MpsSvc start= auto

Again, it bears repeating: the final two services don’t exist on XP machines.

After completing these steps, reboot the PC and see if everything’s working again.

In a later post, I’ll cover Windows Update repair procedures, permissions resets, and plenty more techniques to help repair damaged systems following infection.